Asian Chicken Lettuce Wraps

My family loves P.F. Chang’s Lettuce Wraps, I can remember the very first time I ever had them. I was around 8 and we were visiting friends in Colorado. I remember my girlfriends and I using our chop sticks as drum sticks (much to the dismay of our parents) while we were waiting for the wraps to come out.  With our love of P.F. Chang’s and not having one close by to our new home, I knew I had to come up with a recipe.  Hope you enjoy my version of the wraps as much as we did! 🙂

Chicken Lettuce Wraps via LashesandDashes

Ingredients
1 tablespoon olive oil
1 pound ground chicken
2 cloves garlic, minced
1 onion, diced finely
1/4 cup hoisin sauce
4 tablespoons Braggs Liquid Aminos
1 tablespoon rice wine vinegar
2 tablespoons freshly grated ginger
1 (8-ounce) can sliced water chestnuts, drained and diced
2 green onions, thinly sliced
Bunch of Romaine lettuce

Directions

Heat olive oil in a large saucepan over medium high heat. Add ground chicken and cook until browned, about 3-5 minutes, making sure to crumble the chicken as it cooks; drain excess fat. Stir in garlic, onion, hoisin sauce, soy sauce, rice wine vinegar,and ginger until onions have become translucent, about 1-2 minutes. Stir in chestnuts and green onions until tender, about 1-2 minutes.
To serve, spoon several tablespoons of the chicken mixture into the center of  lettuce leaf, taco-style or if you are like me onto your plate.  Enjoy!

Chateaubriand Recipe

Chateaubriand via LashesandDashes

The finished product.

For Mothers Day here in the US,  I made Chateaubriand, My parents had Chateaubriand the night they were engaged. so it was very special for my Mom. For my first ever traditional French meal I think it turned out wonderful. I made all of the sauces homemade, you can find the recipe Here. I know I will be making this dish again for special occasions! Chateaubriand is not a difficult meal if you follow the recipe.

Chateaubriand via LashesandDashes

Melting the butter.

Chateaubriand via LashesandDashes

Searing the meat.

Chateaubriand via LashesandDashes

Searing the meat on all sides.

Chateaubriand via LashesandDashes

The meat placed on a rack in my pan, ready to go in the oven.

Chateaubriand via LashesandDashes

Chopping the tarragon.

Chateaubriand via LashesandDashes

The meat after cooking in the oven.

Chateaubriand via LashesandDashes

Adding in the shallots.

Chateaubriand via LashesandDashes

Sauteing the shallots.

Chateaubriand via LashesandDashes

Adding in the red wine.

Chateaubriand via LashesandDashes

Adding in the Demi-Glace.

Chateaubriand via LashesandDashes

Tarragon being added in.

Chateaubriand via LashesandDashes

Ingredients

1 thick, center cut tenderloin, approximately 1 pound

2 tablespoons unsalted butter

2 tablespoons olive oil

Salt and freshly ground black pepper, to taste

1 shallot, minced

4 oz. full-bodied red wine

4 oz. Demi glace

1-tablespoon butter, softened

2 teaspoons minced fresh tarragon

Whole tarragon leaves, for garnish

Directions

Preheat your oven to 375º F. Liberally sprinkle salt and pepper on the meat. Preheat an oven-safe heavy skillet or saute pan over medium-high heat. Depending on your stove, this could take 4 or 5 minutes. Add the butter and oil to the pan. When the butter stops foaming, place meat in pan.With tongs, turn the meat and continue searing. If the meat sticks to the pan, leave it for another few seconds. When the sear is complete, the meat will release on its own, so be gentle and patient. Keep an eye on the heat, you may need to adjust it up or down to maintain a good “sizzle ‘ without burning the meat. Remove the meat from the pan, and place an oven-safe rack in the cooking pan. Put the meat on the rack and roast in the oven until the meat has reached an internal temperature of 125º F if you want your meat more on the rare side. I cooked the meat for 25 minutes. Put the meat on a warmed platter to rest for about 15 minutes. The temperature will continue to rise, and your meat will be a perfect medium well. While the meat is resting, prepare the sauce. You should have plenty of oil/butter left in the cooking pan. Place the pan over medium heat – careful, it has been in the oven. Make sure you have an oven mitt, because the handle can burn you. Add the minced shallot and saute until translucent, but not browned. Add the red wine. Turn the heat up to medium high and reduce by half. Add the demi-glace to the pan and reduce for a couple of minutes until the mixture is somewhat syrupy. Taste for seasonings, and add salt and pepper if necessary. Stir in the minced tarragon and remove from the heat. Swirl in the softened butter right before serving. This will help to further thicken the sauce and impart a lovely sheen. We sliced the meat in the kitchen but the traditional preparation would be to slice the meat at the table. I severed this dish with piped mash potatoes but you can use any other side you wish.


Chicken Supreme

Chicken Supreme via LashesandDashes

Today I bring you a recipe that has been in the family for years, it is comfort food in my book! It is also the last dish I made in Georgia, yes I am a bit behind in my recipe blogging. I have been cooking here in Pensacola, just have not ventured to make any new recipes. I promise very soon I will be bringing you new recipes from my new kitchen.

Chicken Supreme via LashesandDashes

Chopped Carrots

Chicken Supreme via LashesandDashes

Chopped Onions.

Chicken Supreme via LashesandDashes

Sauteing the carrots and onions.

Chicken Supreme via LashesandDashes

Our chicken broth.

Chicken Supreme via LashesandDashes

Chicken broth added in and ready to finish cooking.

Chicken Supreme via LashesandDashes

Mixing together the flour and sour cream.

Chicken Supreme via LashesandDashes

Whisking in the sour cream mixture.


Ingredients

4 regular size carrots

3 chicken breast

about 2 cups of chicken broth

1/2 onion chopped finely

2 tablespoons of flour

8 ounces of sour cream

Directions

Slice your carrots thinly. Sauté your onions and your carrots in a little bit of olive oil. Move the onions and the carrots to the side of the pan, put in your chicken breast and brown on both sides. Add in 2 cups of chicken broth with the carrots and the onion on top of the chicken cover with the lid and cook until done. Once chicken is done remove from pan and keep warm. For the sauce: 2 tablespoons of flour mix into sour cream and slowly add in to the chicken broth mixture with onions and the carrots. Continue to mix until it is a smooth consistency, no lumps. If you would like a more liquid sauce add more chicken broth after you have mixed in the sour cream mixture. Serve over brown rice, couscous or potato gnocchi.

Homemade Bread

Homemade Bread via LashesandDashesAs I have mentioned before Here, I have been making all of our bread homemade since the beginning of the year and I am loving it! I love how easy it is to make it and also knowing what is in my bread! Bread is a large part of my food pyramid lol, I have been trying to eat healthier but bread was one thing I was not willing to let go! The recipe I use has been adapted from Make and Take. I have been using King Arthur Flour for this recipe and love it! I have used their cake flour, all purpose and whole wheat flour for this recipe and each time it comes out wonderfully! As I have learned making bread takes time and practice, my first couple of loaves did not turn out as I would have liked but with each batch they would get better. This recipe makes two large loaves, I let mine rise for 5 hours but feel free to let rise for as little as 2 hours.

Homemade Bread via LashesandDashes

Pouring flour into mixing bowl.

Homemade Bread via LashesandDashes

Flour as well as salt in bowl.

Homemade Bread via LashesandDashes

Pouring in yeast.

Homemade Bread via LashesandDashes

In the warm water goes.

Homemade Bread via LashesandDashes

Ready to mix.

Homemade Bread via LashesandDashes

Dough all mixed up and the bowl is ready to be greased

Homemade Bread via LashesandDashes

Greased bowl ready to rises.

Homemade Bread via LashesandDashes

Greased cling wrap tightly covering bowl.

Homemade Bread via LashesandDashes

Bowl covered with cling wrap and towel set in a warm place to rise.

Homemade Bread via LashesandDashes

The dough after the full 5 hours of rising.

Homemade Bread via LashesandDashes

Cutting the dough into two pieces.

Homemade Bread via LashesandDashes

Ball of dough ready to be pulled into loaf.

Homemade Bread via LashesandDashes

After the two loaves rose for 30 minutes.

Homemade Bread via LashesandDashes

Loaves and water in oven ready to bake.

Homemade Bread via LashesandDashes

Baked bread.

Ingredients 

3 cups warm water

1 1/2 tablespoons granulated yeast

1 teaspoon kosher or other course salt

6 1/2 cups unbleached all purpose flour such as King Arthur Organic all purpose flour , plus more for dusting

Olive Oil for greasing bowl

Directions

In the bowl of Kitchen Aid mixer place all of your ingredients. Using flex edge beater mix until dough pulls off  bottom of bowl with no flour on bottom of bowl. While bowl is still raised and dough is still on beater grease all around the bowl with olive oil. Lower bowl and scrape dough off of beater. Grease Cling Wrap with Olive Oil, cover top of bowl with cling wrap making sure there is no air leaking into the bowl. Cover top of bowl with towel and place it in a warm spot. Let rise anywhere between 2-5 hours, I let my bread rise for the full 5 hours. Try not to move bowl from where you first placed it, the more you move it lets air drafts into the bowl. After you have let the bread rise set out two cookie sheets covered with parchment paper. Sprinkle flour on top of dough, using knife cut down the middle of the dough. Flour both hands generously, pull half of bread out of bowl. Pull all of the sides of the bread down onto the bottom to form a large round somewhat flat ball of dough, place unto one of your cookie sheets. Repeat with other half of dough. Cover both loaves with greased cling wrap and let rise for 30 minutes.  Preheat oven to 450. After 30 minutes of rising, slice tops of loaves and take cling wrap off. Place large pot of water on bottom rack of oven, this helps crisp the outside of the bread but keep the inside soft. Place bread into oven for 30-35 minutes, you will know the bread is done when you tap on the top of the bread and sounds hollow. Remove from oven and place bread onto cooling racks. Once the bread is cooled you can either slice it or if you are not going to eat both loaves within a couple days you can freeze the loaf. I slice into pieces for easy use and pull out of freezer what I need at that time.

30 Minute Healthy Dinner Rolls

30 Minute Healthy Dinner Rolls via LashesandDashesFor dinner today we are having Pressure Cooker Chicken, and I decided to make up quick dinner rolls to go with it. Let me just say I was shocked at how well these turned out! I adapted my recipe from Real Mom Kitchen. I wanted to make the rolls a bit healthier so I used Honey instead of sugar and Coconut Oil instead of regular oil. I also used cake flour instead of all-purpose since its all I had on hand today, I desperately need to run out to the store to buy more flour. I think I use 10 pounds of flour in a month, crazy! These rolls will become regulars in our house for sure!! Next time I think I will double the recipe and freeze half to pull out when ever we want rolls.

30 Minute Healthy Dinner Rolls via LashesandDashes

Proofed Yeast.

30 Minute Healthy Dinner Rolls via LashesandDashes

Mixing the dough.

30 Minute Healthy Dinner Rolls via LashesandDashes

Dough all mixed up, with the sides of the bowl clean.

30 Minute Healthy Dinner Rolls via LashesandDashes

The 12 sectioned rolls.

30 Minute Healthy Dinner Rolls via LashesandDashes

Forming the rolls.

30 Minute Healthy Dinner Rolls via LashesandDashes

Forming the other side of the roll.

30 Minute Healthy Dinner Rolls via LashesandDashes

Bottom of formed roll.

30 Minute Healthy Dinner Rolls via LashesandDashes

Rolls before sitting for 10 minutes.

30 Minute Healthy Dinner Rolls via LashesandDashes

After the rolls had sat.

30 Minute Healthy Dinner Rolls via LashesandDashes

Baked Rolls.

30 Minute Healthy Dinner Rolls via LashesandDashes

Finished product.

30 Minute Rolls
Ingredients

1 cup plus 2 Tbsp warm water
1/3 cup melted Coconut oil
2 Tbsp yeast
1/8 cup honey
dash of salt
1 egg
3½ cups cake flour

Instructions

Preheat oven to 400 degrees.
In the bowl of a stand mixer, combine water, oil, yeast, and honey. Allow mixture to rest for 15 minutes.
With the flex edge beater mix in salt and egg and 2 of the cups flour until combined. Add remaining flour ½ cup at a time.
Section dough into 12 balls. Shape dough by pulling sides and folding under into 12 balls and let rest for 10 minutes.
Place rolls on baking sheet lined with parchment paper. Bake at 400 degrees for 10 minutes until tops are golden brown. Makes 1 dozen.

Homemade Garlic Croutons

While I was waiting for my Bread Pudding to set, I whipped up these croutons. I had homemade French Bread left over in the freezer and decided to use it for this 🙂 Ever since the beginning of the year I have been making all of our bread homemade. Once you have tasted homemade bread out of the oven it is hard to go back to the store bought! I love being able to control what is going in the bread instead of buying bread that you can not even pronounce the ingredients! I love making bread, making bread for me is like gardening for others, very relaxing! I love this recipe because it is so simple to make but it makes a big impression and tastes yummy on a salad!

Homemade Garlic Croutons

Mixing the olive oil and bread.

Homemade Garlic Croutons

Bread ready to go into the oven.

Homemade Garlic Croutons

Croutons baked.

Ingredients

Half loaf of Crusty French bread

1/2 cup Olive oil

1/2 tsp fresh garlic

Directions

Preheat oven to 400 degrees F. Cut bread into cubes and place in a large bowl. Drizzle cubes with olive oil and garlic. Mix well. Spread bread onto a lined sheet pan and bake for about 20 minutes.

You can very easily tweak this recipe to your own taste, you could add cheese, or other seasoning 🙂

Chicken in A Cloud

Chicken in a Cloud via LashesandDashes

The finished product.

I made Chicken in a Cloud a few nights ago from an old recipe my mom had, but made it my own. These petite “Pies” with a hash brown crust are the perfect dish to serve for lunch or dinner with a side salad! You may remember back in November, I posted my recipe for Turkey Pot Pie that could easily be made into a chicken pot pie, well the Chicken Baskets are a delish twist on an old favorite! This dish is also a great way to use up cooked chicken! Lets dive in to this warm yumminess!

Chicken in a Cloud via LashesandDashes

Saute the carrots and onions.

Chicken in a Cloud via LashesandDashes

Mixing together the flour and sauteed veggies.

Chicken in a Cloud via LashesandDashes

Thickening the filling mixture.

Chicken in a Cloud via LashesandDashes

Hashbrowns in the ramekin ready for the filling.

Chicken in a Cloud via LashesandDashes

The Mini “Pies” ready to go into the oven.

Chicken in a Cloud via LashesandDashes

The finished product.

Ingredients 

5 cups frozen shredded hash brown potatoes, thawed

Filling

1/2 onion chopped

1 cup chopped carrots or any veggie of your liking

2 TBS Olive Oil

1/4 cup all purpose flour

1 cube chicken bouillon I used Herbox Sodium free chicken

1 tsp Worcestershire

1/2 tsp dried Basil

1 cup half and half

1 cup milk

3 cups cooked cubed chicken

Directions

Preheat oven at 375. In a saucepan saute onions and carrots in Olive Oil. Add in flour, bouillon, Worcestershire, and basil slowly, whisking as you pour to combine dry ingredients with the sauteed veggies. Whisk in milk and cream. Bring to a boil, cook and stir for 2 minutes or until thickened. Add in chicken. Press thawed hash browns into four greased ramekins on bottom and sides of the ramekins. Spoon filling into ramekins. Place ramekins on a covered baking sheet. Bake uncovered for 30-35 minutes.

Rich Man, Poor Man Steak

Rich Man Poor Man Steak via LashesandDashesOne day last week I found a pack of ground meat in the freezer, I was tired of Spaghetti, Tacos, and Chili, so I came up with Rich Man, Poor Man Steak. The thought behind the name is you can use any grade of meat in this dish and it will turn out wonderful! We used ground round but you could use ground chuck or ground beef, also you could mix half turkey into the beef to make this dish healthier. Have fun experimenting with any type of meat, I think you will fall in love with this easy meal!

Rich Man, Poor Man Steak via LashesandDashes

Rich Man, Poor Man Steak via LashesandDashes

Rich Man, Poor Man Steak via LashesandDashes

Rich Man, Poor Man Steak via LashesandDashes

Rich Man, Poor Man Steak via LashesandDashes

Rich Man, Poor Man Steak via LashesandDashes

Rich Man, Poor Man Steak via LashesandDashes

Rich Man, Poor Man Steak via LashesandDashes

Rich Man, Poor Man Steak via LashesandDashes

Rich Man, Poor Man Steak via LashesandDashes

Rich Man, Poor Man Steak via LashesandDashes

Rich Man, Poor Man Steak via LashesandDashes

Rich Man, Poor Man Steak via LashesandDashes

Rich Man, Poor Man Steak via LashesandDashes

Ingredients

8 ounces fresh mushrooms washed and sliced

1 1/2 lb ground round

1 cup dry breadcrumbs

1 egg mixed with a teaspoon of water

2 teaspoons of Steak sauce

2 teaspoons Worcestershire sauce

1/4 teaspoon freshly ground black pepper

3 TBS Olive Oil

1 Packet of Brown gravy or Mushroom gravy

1 1/2 cups water

Directions

Place ground round in a mixing bowl, break apart with a fork. Pour the Worcestershire sauce, Steak sauce, bread crumbs and the egg mixture into the meat, mix the meat together with your hands. Form into four large patties. Brown cut mushrooms in a large pan with 2 tablespoons of Olive Oil until tender, remove from pan into a bowl. Place 1 tablespoon of oil in hot pan carefully place patties in oil, cook until brown on both sides. While the patties are browning whisk together gravy packet with 1 1/2 water. When the patties are brown on both sides pour the gravy on top and around the patties in the pan, scoop mushrooms into pan and on top of patties. Set timer for 10 minutes. After the 10 minutes flip the patties, after you have flipped them make sure to spoon some of the gravy and mushrooms on top of the patties. You can add a couple tablespoons of water at that point if to much water has evaporated. Set timer for another 10 minutes. We served it with white rice but you could also serve it with noodles or mashed potatoes. Enjoy 🙂

One Chicken, Two Ways, Three Meals

One Chicken, Two Ways, Three Meals.

One Chicken, Two Ways, Three Meals via LashesandDashes

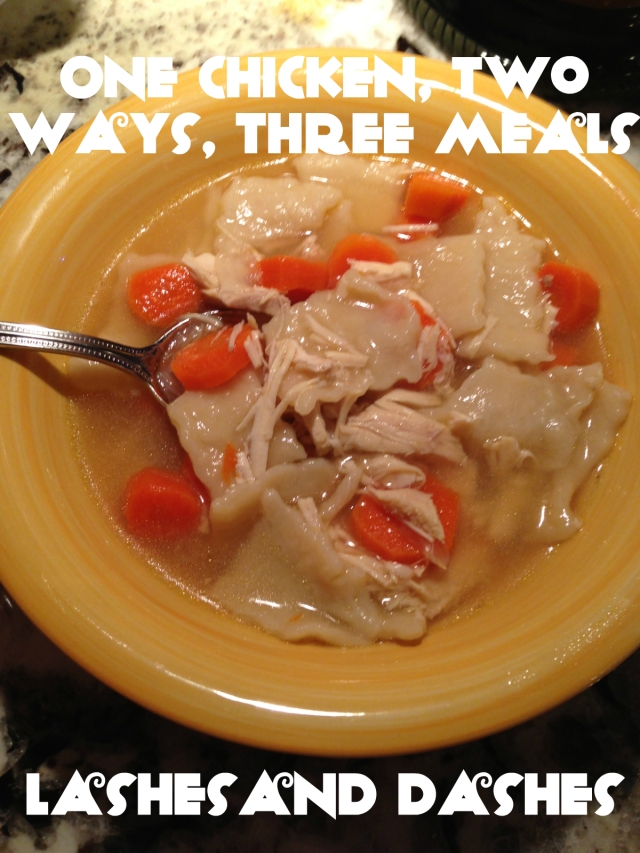
I don’t know about you but my family loves a easy meal that makes a lot of food! Today I bring you three meals from one whole Chicken. The first meal is my Dad’s Pressure Cooker Chicken. Some families make pot roast every Sunday, in our House you can find Pressure Cooker Chicken on our table a couple Sundays out of the month! The next Dish is my Chicken and Dumplings, perfect for a cold day spent by the fire! The Chicken and Dumplings make enough to have for lunch the next day. The Chicken and Dumplings are super easy to make seeing as you have all ready cooked the chicken and broth the day before.

We absolutely love our Wolfgang Puck Automatic 8-Quart Rapid Pressure Cooker! We use it several times a week when we are not traveling. If you do not have a pressure cooker feel free to use a crock pot, just note that it will take longer to cook.

Wolfgang Puck Pressure Cooker via LashesandDashes

One Chicken, Two Ways, Three Meals via LashesandDashes

One Chicken, Two Ways, Three Meals via LashesandDashes

One Chicken, Two Ways, Three Meals via LashesandDashes

One Chicken, Two Ways, Three Meals via LashesandDashes

One Chicken, Two Ways, Three Meals via LashesandDashes

One Chicken, Two Ways, Three Meals via LashesandDashes

One Chicken, Two Ways, Three Meals via LashesandDashes

One Chicken, Two Ways, Three Meals via LashesandDashes

One Chicken, Two Ways, Three Meals via LashesandDashes

Dads Pressure Cooker Chicken.

Ingredients 

5 pound whole chicken, cleaned and rinsed

4 whole carrots, chopped

4 stalks of celery, cut in thirds.

1 small onion, peeled and chopped

Seasonings how you like, we season with a bay leaf, salt and pepper.

32 ounces of low sodium Chicken Broth

2 TBS Olive Oil

Directions

Brown both sides of the chicken in the pressure cooker with Olive Oil, add remaining ingredients into pressure cooker. Put lid on, seal the pressure cooker. Set timer for 50 minutes. After the 50 minutes allow the Pressure Cooker to depressurize. Remove the vegetables into a bowl, remove Chicken onto a cutting board, use caution when removing from the Pressure Cooker contents are very hot!  The Chicken will fall apart when removing it from the Pressure Cooker, my Dad places the chicken onto a large wooden cutting board that has a drip tray. Use tongs and a fork to separate the Chicken from the bones. Strain the broth into a fridge safe container. If making gravy utilize some of the broth, add equal parts flour and water as a thickening agent.

Place the Chicken in a fridge safe container separate from the broth.

Chicken and Dumplings 

Ingredients

Leftover Chicken

Broth from above recipe

Small bag of Whole carrots, chopped

1 small onion peeled and chopped

1 1/2 cup water

Recipe for Dumplings

2 cups all purpose flour

3/4 cup ice water

dash of salt

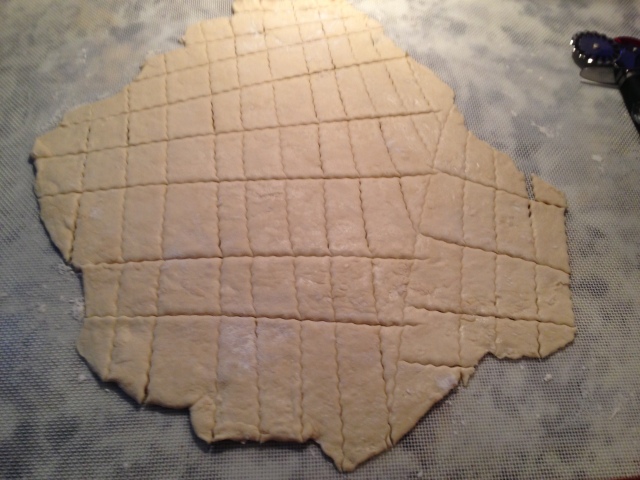
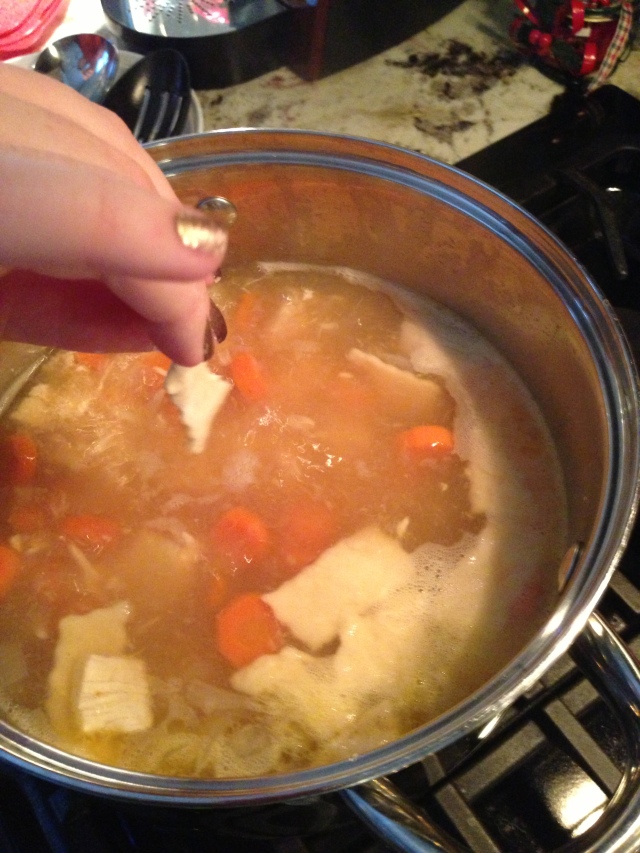
Skim off fat from broth, discard. Put skimmed broth in a stock pot, add in water. Add vegetables, cook until softened. While your vegetables are cooking make the dough for your dumplings. Place flour in a large bowl, make a well in the flour. Add ice water into well of flour a couple tablespoons at a time, incorporate the water into the flour until it is mixed well, the dough should be a bit sticky. Place ball of dough onto a floured surface, roll dough until 1/8 in thick. Cover and let sit for 20 minutes. While the dough is resting add in your cut up chicken to the broth, bring to a boil. Once your dough is done resting use a fluted pastry cutter to cut the dumpling dough into small pieces, make sure to separate the dough once it is cut from the uncut dough because the dough will stick to its self. Carefully drop the dough pieces one by one into the boiling broth. Stir so that the dumplings are distributed through the broth. Once the dumplings have floated to the top of the pot the dish is done. Refrigerate the leftovers for lunch the next day.  Enjoy!

Cheesy Potato Soup

This recipe is a favorite in my family! Whenever we need a quick meal to warm us up this is our go to, if you have any left it reheats wonderfully! I love to take this soup in a thermos for Lunches at work, it is like a hug in a cup!
Cheesy Potato Soup via LashesandDashes
1 1/2 TBS Olive Oil
1 med chopped onion
1 cup chopped carrots
2 celery stalks, stringed and finely chopped
1 tsp minced garlic
32 ounces low sodium chicken broth
8 potatoes, peeled and chopped
2 TBS flour
2 TBS water
2/3 cup half and half
In a large hot soup pot,  place Olive Oil, add garlic and onions saute until softened, add carrots, and celery and saute over medium heat until tender.  Add chicken broth and potatoes, bring to a boil, and cook until potatoes are tender.  Mix flour with water, whisk into broth, and simmer until soup is slightly thickened.  Whisk  half and half  into soup, cook until heated through.  Stir in cheese, until melted and blended. Serve piping hot.
You can add other vegetables of your choice, or to make it a complete meal you could add cooked cut up chicken or any other meat of your choice. Enjoy!