No Sew Toms Fix

My Toms were in desperate need of help, and I knew I did not want to throw them out or buy a new pair so I looked on Pinterest and low and be hold there were many tutorials. I adapted my tutorial from this blog post by The Carbon Magazine Post Here.

No Sew Toms Fix via LashesandDashes

I will let the picture speak for themselves, but a couple notes before we get into that. You can use either a razor knife or scissors to do your cutting I prefer the scissors but it is completely up to you. Also I played around with the pieces of fabric, on one shoe I cut the fabric to fit the shoe on the other I cut strips of fabric larger then the area I needed to cover. I found that cutting strips of fabric was the better choice of the two. If you will be washing your Toms after you have refinished them be sure to wash the fabric before you cover the shoe. I did not wash my fabric because I do not plan on washing my Toms.

The Supplies you will need for this project are as follows:

3/4 yard of non stretch cotton fabric (this will be more then enough for this project but I always think it is better to be safe then sorry)

Fabri-Tac Glue

Scissors or Sharp Razor Knife

Ribbon or cording

Old Fabric Toms

No Sew Toms Fix via LashesandDashes

As you can see it was a cheap fix.

All of the Supplies you will need for this project except for scissors

All of the Supplies you will need for this project except for scissors

Stuff the shoes with tissue paper.

Stuff the shoes with tissue paper.

Glue any holes together with the FabriTac

Glue any holes together with the FabriTac

Cover the first section of the shoe with the FabriTac

Cover the first section of the shoe with the Fabri-Tac then take a section of your fabric and place it on the glue. Press the fabric into the glue to make sure it bonds. Make sure to fold the fabric in the front of the shoe just like the original fabric.

Use either a sharp razor knife or scissors to cut off the excess fabric from the shoe. Follow the sole of the shoe when cutting.

Use either a sharp razor knife or scissors to cut off the excess fabric from the shoe. Follow the sole of the shoe when cutting.

Continue with the rest of the sections of the shoe as explained above.

Continue with the rest of the sections of the shoe as explained above.

Here I have glued together a large slit in the back of the shoe. Very carefully cut of the Toms logo on the back of the shoe.

Here I have glued together a large slit in the back of the shoe. Very carefully cut of the Toms logo on the back of the shoe.

No Sew Toms Fix via LashesandDashes

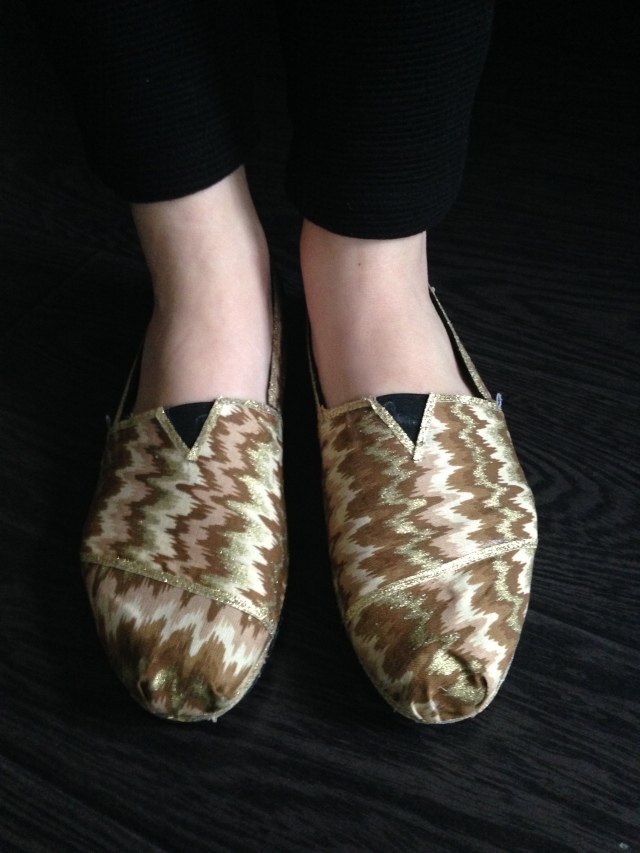
You can stop at the above step if you would like. I wanted to give the shoe a bit more pizzazz so I glued a very thin gold ribbon onto the shoe wherever the fabric meets.

The Finished Product.

The Finished Product.

No Sew Toms Fix

My Toms were in desperate need of help, and I knew I did not want to throw them out or buy a new pair so I looked on Pinterest and low and be hold there were many tutorials. I adapted my tutorial from this blog post by The Carbon Magazine Post Here.

No Sew Toms Fix via LashesandDashes

I will let the picture speak for themselves, but a couple notes before we get into that. You can use either a razor knife or scissors to do your cutting I prefer the scissors but it is completely up to you. Also I played around with the pieces of fabric, on one shoe I cut the fabric to fit the shoe on the other I cut strips of fabric larger then the area I needed to cover. I found that cutting strips of fabric was the better choice of the two. If you will be washing your Toms after you have refinished them be sure to wash the fabric before you cover the shoe. I did not wash my fabric because I do not plan on washing my Toms.

The Supplies you will need for this project are as follows:

3/4 yard of non stretch cotton fabric (this will be more then enough for this project but I always think it is better to be safe then sorry)

Fabri-Tac Glue

Scissors or Sharp Razor Knife

Ribbon or cording

Old Fabric Toms

No Sew Toms Fix via LashesandDashes

As you can see it was a cheap fix.

All of the Supplies you will need for this project except for scissors

All of the Supplies you will need for this project except for scissors

Stuff the shoes with tissue paper.

Stuff the shoes with tissue paper.

Glue any holes together with the FabriTac

Glue any holes together with the FabriTac

Cover the first section of the shoe with the FabriTac

Cover the first section of the shoe with the Fabri-Tac then take a section of your fabric and place it on the glue. Press the fabric into the glue to make sure it bonds. Make sure to fold the fabric in the front of the shoe just like the original fabric.

Use either a sharp razor knife or scissors to cut off the excess fabric from the shoe. Follow the sole of the shoe when cutting.

Use either a sharp razor knife or scissors to cut off the excess fabric from the shoe. Follow the sole of the shoe when cutting.

Continue with the rest of the sections of the shoe as explained above.

Continue with the rest of the sections of the shoe as explained above.

Here I have glued together a large slit in the back of the shoe. Very carefully cut of the Toms logo on the back of the shoe.

Here I have glued together a large slit in the back of the shoe. Very carefully cut of the Toms logo on the back of the shoe.

No Sew Toms Fix via LashesandDashes

You can stop at the above step if you would like. I wanted to give the shoe a bit more pizzazz so I glued a very thin gold ribbon onto the shoe wherever the fabric meets.

The Finished Product.

The Finished Product.